Mold Features
The Rotational Molding process uses 3 different manufacturing processes to build molds; also referred to as a tools. Fabrication, aluminum casting and CNC machining Aluminum. Even though the tool manufacturing processes are different the end goal is the same; to build a dimensionally accurate hollow cavity with all the features necessary to safely operate the mold in a manner which helps prolong the life of the mold, provide good surface finish and reduce cycle times.
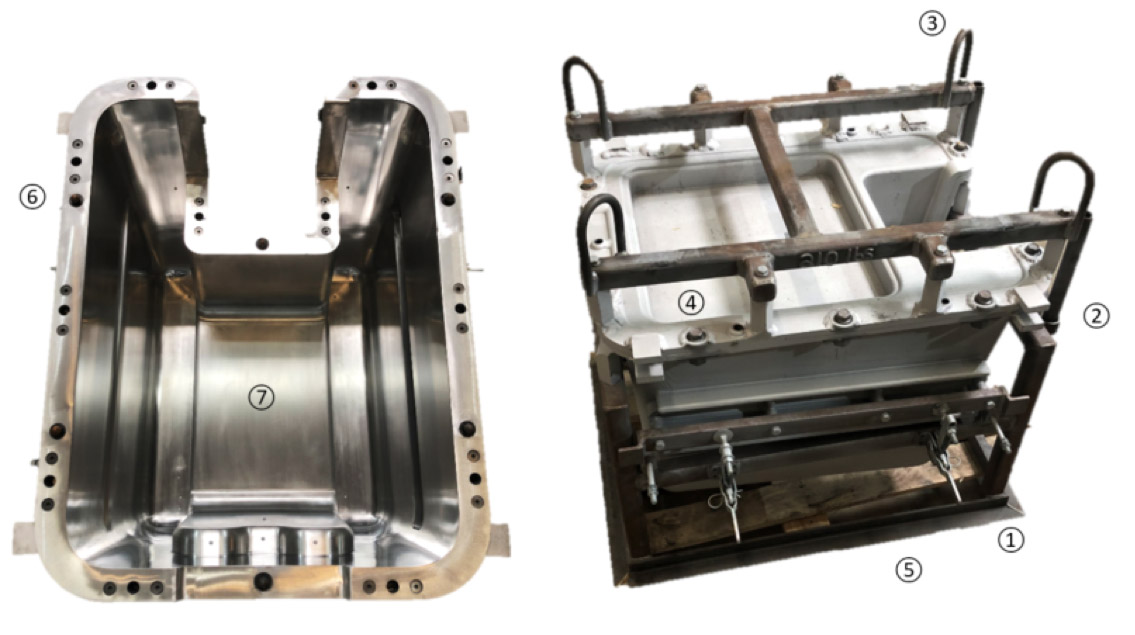
① Steel frame: Molds are frequently mounted and dismounted from the rotational molding ovens. Not only does the steel frame provide a rugged support structure but it also provides a surface to which the mold can be anchored on the machine.
② Pry points and guide rails: Pry points provide machine operators with an option to carefully separate the mold sections. The interior surface of a mold is critical so guide rails provide operators with the ability to locate and align the mold sections before closing the cavity. This prevents the possibility of a mismatch when closing the mold.
③ Crane hoist hooks: These provide operators with the ability to attach a crane hoist hook to the mold.
④ Bot through flanges: These usually consist of a hardened bushing and a nut receiver so that the mold can withstand frequent fastening and unfastening of ½” bolts which run through the flange. ½” bolts are what hold the mold sections together.
⑤ Loose pieces: Loose pieces are created so that undercuts can be molded into a product. Loose pieces are carefully machined and mated to the rest of the mold. Most companies use ‘Destaco clamps’ to hold loose pieces in place.
⑥ Guide pins: Guide pins are hardened nipples which are placed on the flange and act as a guide when mating the mold sections together.
⑦ Surface finish (texture): All rotational molding tools have an inside surface which can range from a high polish to a rough bead blast. This is what creates the desired appearance of the rotomolded part at the end of the molding cycle.